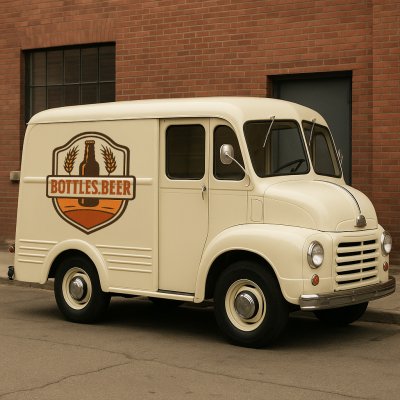
A classic beer truck for ceramic beer bottles
A classic mid-1900s delivery truck!

Imagine if we could treat beer like they did milk decades ago. Trucks delivered it to people's homes every day, picking up the empties for washing and reuse. People left their doors open and the milkman went right into the house and put the milk, which was in glass bottles, into the fridge!
Context: The bottle is more.., v7 Classic beer bottle..
Tuesday 5th August 2025
An 85-year-old Medalta Thrown Beer Bottle:
How can it be so white, speck-free and uncrazed?

These (right) were made individually in the factory during the 1930s and 1940s (the insides have pronounced throwing rings and slip drips). The potters were able to make up to 500 per day, even though they took the time to smooth the outside using a rib! The inside base of this one is bowl-shaped (the walls near the base are very thick), this helps explain how they were able to throw them so quickly.
Perhaps most surprising is how much whiter and speck-free the bottle is even though it is fired four cones higher than the crock (Plainsman M340 at cone 6). Both pieces have porosities above 2%. Why? First, they got their clay from further east in Saskatchewan (near Willows), where the cleanest clays are much lower in iron contamination (likely the H0009 body). The whiteness is better even though they would have had to add some ball clay to make the clays more wheel-throwable. Second, they employed a wet process to refine the clay (slaking, blunging, sieving and filter pressing), this enabled them to sieve out the iron pyrite particles. Fortunately, modern dry grinding and air separation equipment is greener and able to accomplish without water.
Notice also the transparent G1129 glaze on the beer bottle (the upper section is likely the same glaze stained using iron oxide): After almost 100 years it has not crazed. This is both a testament to the ease of glaze fit these natural materials offer (because of the high quartz content) and the skill of the engineers of the time at matching the thermal expansion of glaze and body.
Context: New incentive to develop..
Saturday 12th July 2025
Classic Medalta Potteries Beer Bottle
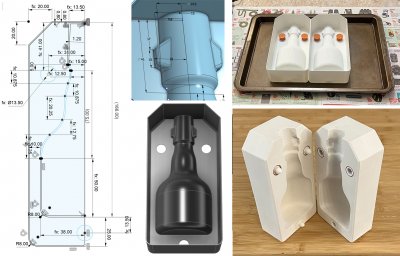
Make this mold using OnShape and Fusion 360
v6 Beer Bottle Drawing
Fits standard swing top stoppers.
Available on the Downloads page

3D print this, pour in plaster to make a slip casting mold! My previous work on this project assumed a smaller 3D printer (making it necessary to print flanged PLA mold sections that clip together). But larger 3D printers are now common, making the CAD work much easier. This OnShape drawing is parametric for height, body diameter, wall and plaster thickness, and neck height (for the full bottle set body=160mm, neck=96). This uses my standard natch system. Neck vertices are proportional to height, so resizing works well. The top end is filleted to permit the longest possible mold on the print bed (diagonally). The bottom inside perimeter is chamfered, strengthening the default 0.8mm side wall junction to the base (that being said, be careful not to flex it too much when removing it from the print bed).
Doing this smaller size is for prototyping and testing. Casting plaster on a 3D print creates artifacts; these were not an issue. This PLA mold prints quickly, it has a hollow back side, permitting easy removal with a heat gun. There is no spare, it employs a pour spout, making the mold shorter and producing a better lip.
Need a stoneware slip casting recipe? L4768E or L4768H are a good choice. A glaze recipe? How about GA6-B (or similar)? Go full DIY with this, you will never turn back.
Context: Swing Top Stopper Mechanism.., A 3D Printed Mold.., DIY natches spacers and.., Here s my setup.., v7 Classic beer bottle.., Beer Bottle Master Mold..
Monday 30th June 2025
Regular bottles of beer looking humble beside the ceramic one

This is v2 ceramic beer bottle in a common-sized 6-pack case. Of course, our case will have our logo and artwork. I paid $19 for it. They threw in the bottles of beer for free! That is a ceramic bottle that has bumped out the ordinary glass one and is showing off its size and superior character. But it is a tight fit in this case - it appears to be 4mm too large in diameter. I am sworn not to have another beer until it is served in a proper ceramic bottle like this. So if you live in my home town and want those six unneeded bottles, let me know.
Context: This GA6-B glaze is.., The bottle is more.., v7 Classic beer bottle.., Say goodbye to ordinary.., Beer Bottle Master Mold..
Wednesday 28th August 2024
This GA6-B glaze is better than beer bottle glass

Ceramic glazes, like this GA6-B, are actually just glass. But they are not like bottle glass. The latter is formulated to work well in forming machines (harden quickly), melt and stiffen quickly, have low melt viscosity and resist milkiness and crystallization on solidification. The chemistries to accomplish this have adequate resistance to leaching and adequate durability for a few uses. A stoneware glaze melt needs to be much more viscous (to stay put on vertical surfaces). And, it must have a lower thermal expansion (to match common clay bodies). And, it must resist crystallization much more (since it cools slowly). Fortunately, meeting these needs brings along big benefits: Greater durability, hardness and resistance to leaching. Stoneware glazes and bottle glass share a common trait: They have about the same amount of SiO2. But the similarity ends there, stoneware glazes have:
-High Al2O3. Three to five times more! It is the key oxide for durable glass. And it stiffens the melt (that disqualifies high levels from bottle glass).
-The same fluxes (CaO, MgO, K2O, Na2O). But they distribute very differently (half the CaO, half to one third the KNaO, much more MgO). Other fluxes like SrO, Li2O are also common.
-Low KNaO (which they call R2O). In glazes, it produces crazing, 5% is a typical maximum. But bottle glass can have double or triple that (the high thermal expansion is not an issue, and its cheap source materials supply lots of melting power).
-B2O3 melter. It is expensive but can be justified because the glaze is just a thin layer. Glazes at the low end of the stoneware range have 5% or more boron.
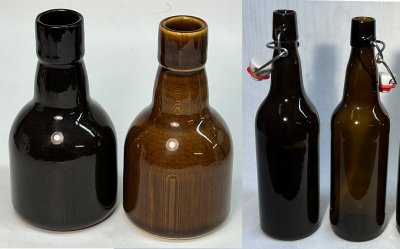
Far right: A glass bottle. Left: Small test bottles made from dark and light burning stonewares. Third: A production ceramic bottle. Notice how much the dark body darkens the GA6-B glaze.
Context: 3D-printing artifacts on a.., Meet two glazes at.., Regular bottles of beer.., v7 Classic beer bottle.., Food Safe, Beer Bottle Master Mold..
Wednesday 7th January 2026
The bottle is more important than the beer!

What is depicted here doesn't happen with ceramic beer bottles. They do the talking. They talk about how we should be manufacturing our own stuff locally. They remind us that we make beer here so we should also make the bottles. They tell us we should take pride in things we can manufacture ourselves. That we should use local raw materials rather than importing them. Glass bottles are just a container, ceramic bottles elevate beer, they bring sustainability and style to beer drinking. Ceramic bottles bring local craftsmen to your beer experience - potters can make them. Ordinary glass will always be just ordinary glass, but ceramic bottles bring a world of aesthetic possibilities to this basic part of our culture.
Context: Assorted problems with 3D.., Regular bottles of beer.., A classic beer truck.., Say goodbye to ordinary.., Beer Bottle Master Mold..
Thursday 1st August 2024
Pouring the v4 Plaster Beer Bottle Mold

This project is a testament to my wife's patience with me using her kitchen as a mold-making shop. Most of the tools I need are there. A nice stable table to run two 3D printers, lots of room and plugins, electrical appliances, utensils and supplies of every type, good lighting. And pleasant company!
I have already poured PMC-746 rubber into 3D printed block molds and have printed and put in place stabilizers to hold the rubber in place. Embeds are in place on both the bottle base and bottom mold (upper right). The flexibility of this rubber is amazing, it makes possible extraction of the plaster base, although with difficulty. It also preserves the embossed logo on the foot. This is version 4 (version 5 will have a shallow base piece and modified sliding natches).
The $5 garage sale mixer does not pull bubbles to the surface so I just pull them up by counter-stirring with a serving spoon. A common sense workflow (never pouring any down the sink, cleaning everything in a settling bucket) makes this no problem in the kitchen.
Context: v3 Ceramic Beer Bottle.., 3D printing case vs.., Glazy Plaster Calculator, Say goodbye to ordinary.., Beer Bottle Master Mold..
Monday 30th November -0001
v3 Ceramic Beer Bottle Mold Drawing Obsoletes Previous

Something I love about 3D parametric CAD is how a drawing can evolve to be both simpler and better. While my version 2 drawing had about 20 steps, this one is down to nine. No more ribs, no offsets or mirrors in the sketches, no double-revolves and no seams across the mount ads. Printing will be dramatically faster. The quality of the side rails is now the key factor in final mold accuracy (these stabilize it while filling with plaster from the back).
I now draw the simplest repeatable shape: A one-quarter slice. Step 5 cuts the bottle profile from the solid block extruded in step 4. The preceding steps were a sketch of the bottle and block outline and a plane and sketch for the pad. Steps 6 and 7 are the extrusion and corner rounding of the pad cutout (near the rim). The last two steps mirror this quarter upward to create the block and then shell it to hollow the back side.
The drawing is now fully parametrically resizable, I have taken advantage of that to make a stubby bottle test. Neck spline points are now spaced vertically as a percentage of the neck height parameter - set at "70" here. The body and neck heights are separately set now so the full height is now a driven dimension - it is 146 here.
Context: Pouring the v4 Plaster.., Beer Bottle Master Mold..
Monday 30th November -0001
Ceramic beer bottles with iron red glaze


